|
|
|
1
|
Create Project
- Create a new project.
- Go to Project
- Start new project
- Enter the name as Math Quiz
- OK
|
|
|
|
2
|
Add Screen Properties
- Go to Properties Panel
- Scroll Down
- Search for Theme
- Set it to Device Default
|
|
|
|
3
|
Change Title
Change the Title to ‘Math Quiz’

|
|
|
|
4
|
Add Label for First Question
- From the Palette
- Go to User Interface
- Drag and Drop Label to the Viewer Panel
- Rename the Label to Question_Box1 in Components Panel By clicking it and clicking on Rename
- Go to Properties Panel and set the width to Fill parent
- set FontSize to 25
- Set Text to 1. What is 5+5?
|
|
|
|
5
|
Add TextBox for Answer input
- From the Palette
- Go to User Interface
- Drag and Drop the TextBox to the Viewer Panel below the Question_Box1
- Rename the TextBox to Answer_Box1 by clicking on Rename
- Go to Properties Panel
- Set BackgroundColor to Light Grey.
- Remove the Hint in Text Box

|
|
|
|
6
|
Add Check button for Question1
- From the Palette
- Go to User Interface
- Drag and Drop the Button to the Viewer Panel below the Answer_Box1
- Rename the Button to Check_Button1 by clicking on Rename
- Enter text as Check

|
|
|
|
7
|
Add Label Question 2
- From the Palette
- Go to User Interface
- Drag and Drop Label to the Viewer Panel
- Rename the Label to Question_Box2 in Components Panel By clicking it and clicking on Rename
- Go to Properties Panel and set the width to Fill parent
- Set FontSize to 25
- Set Text to 2. What is 100X5?

|
|
|
|
8
|
Add Text box to Input Answer for Question2
- From the Palette
- Go to User Interface
- Drag and Drop the TextBox to the Viewer Panel below the Question_Box2
- Rename the TextBox to Answer_Box2 by clicking on Rename
- Go to Properties Panel
- Set BackgroundColor to Light Grey.
- Remove Hint in the Text Box

|
|
|
|
9
|
Add Button for Question 2
- From the Palette
- Go to User Interface
- Drag and Drop the Button to the Viewer Panel below the Answer_Box2
- Rename the Button to Check_Button2 by clicking on Rename
- Enter text as Check
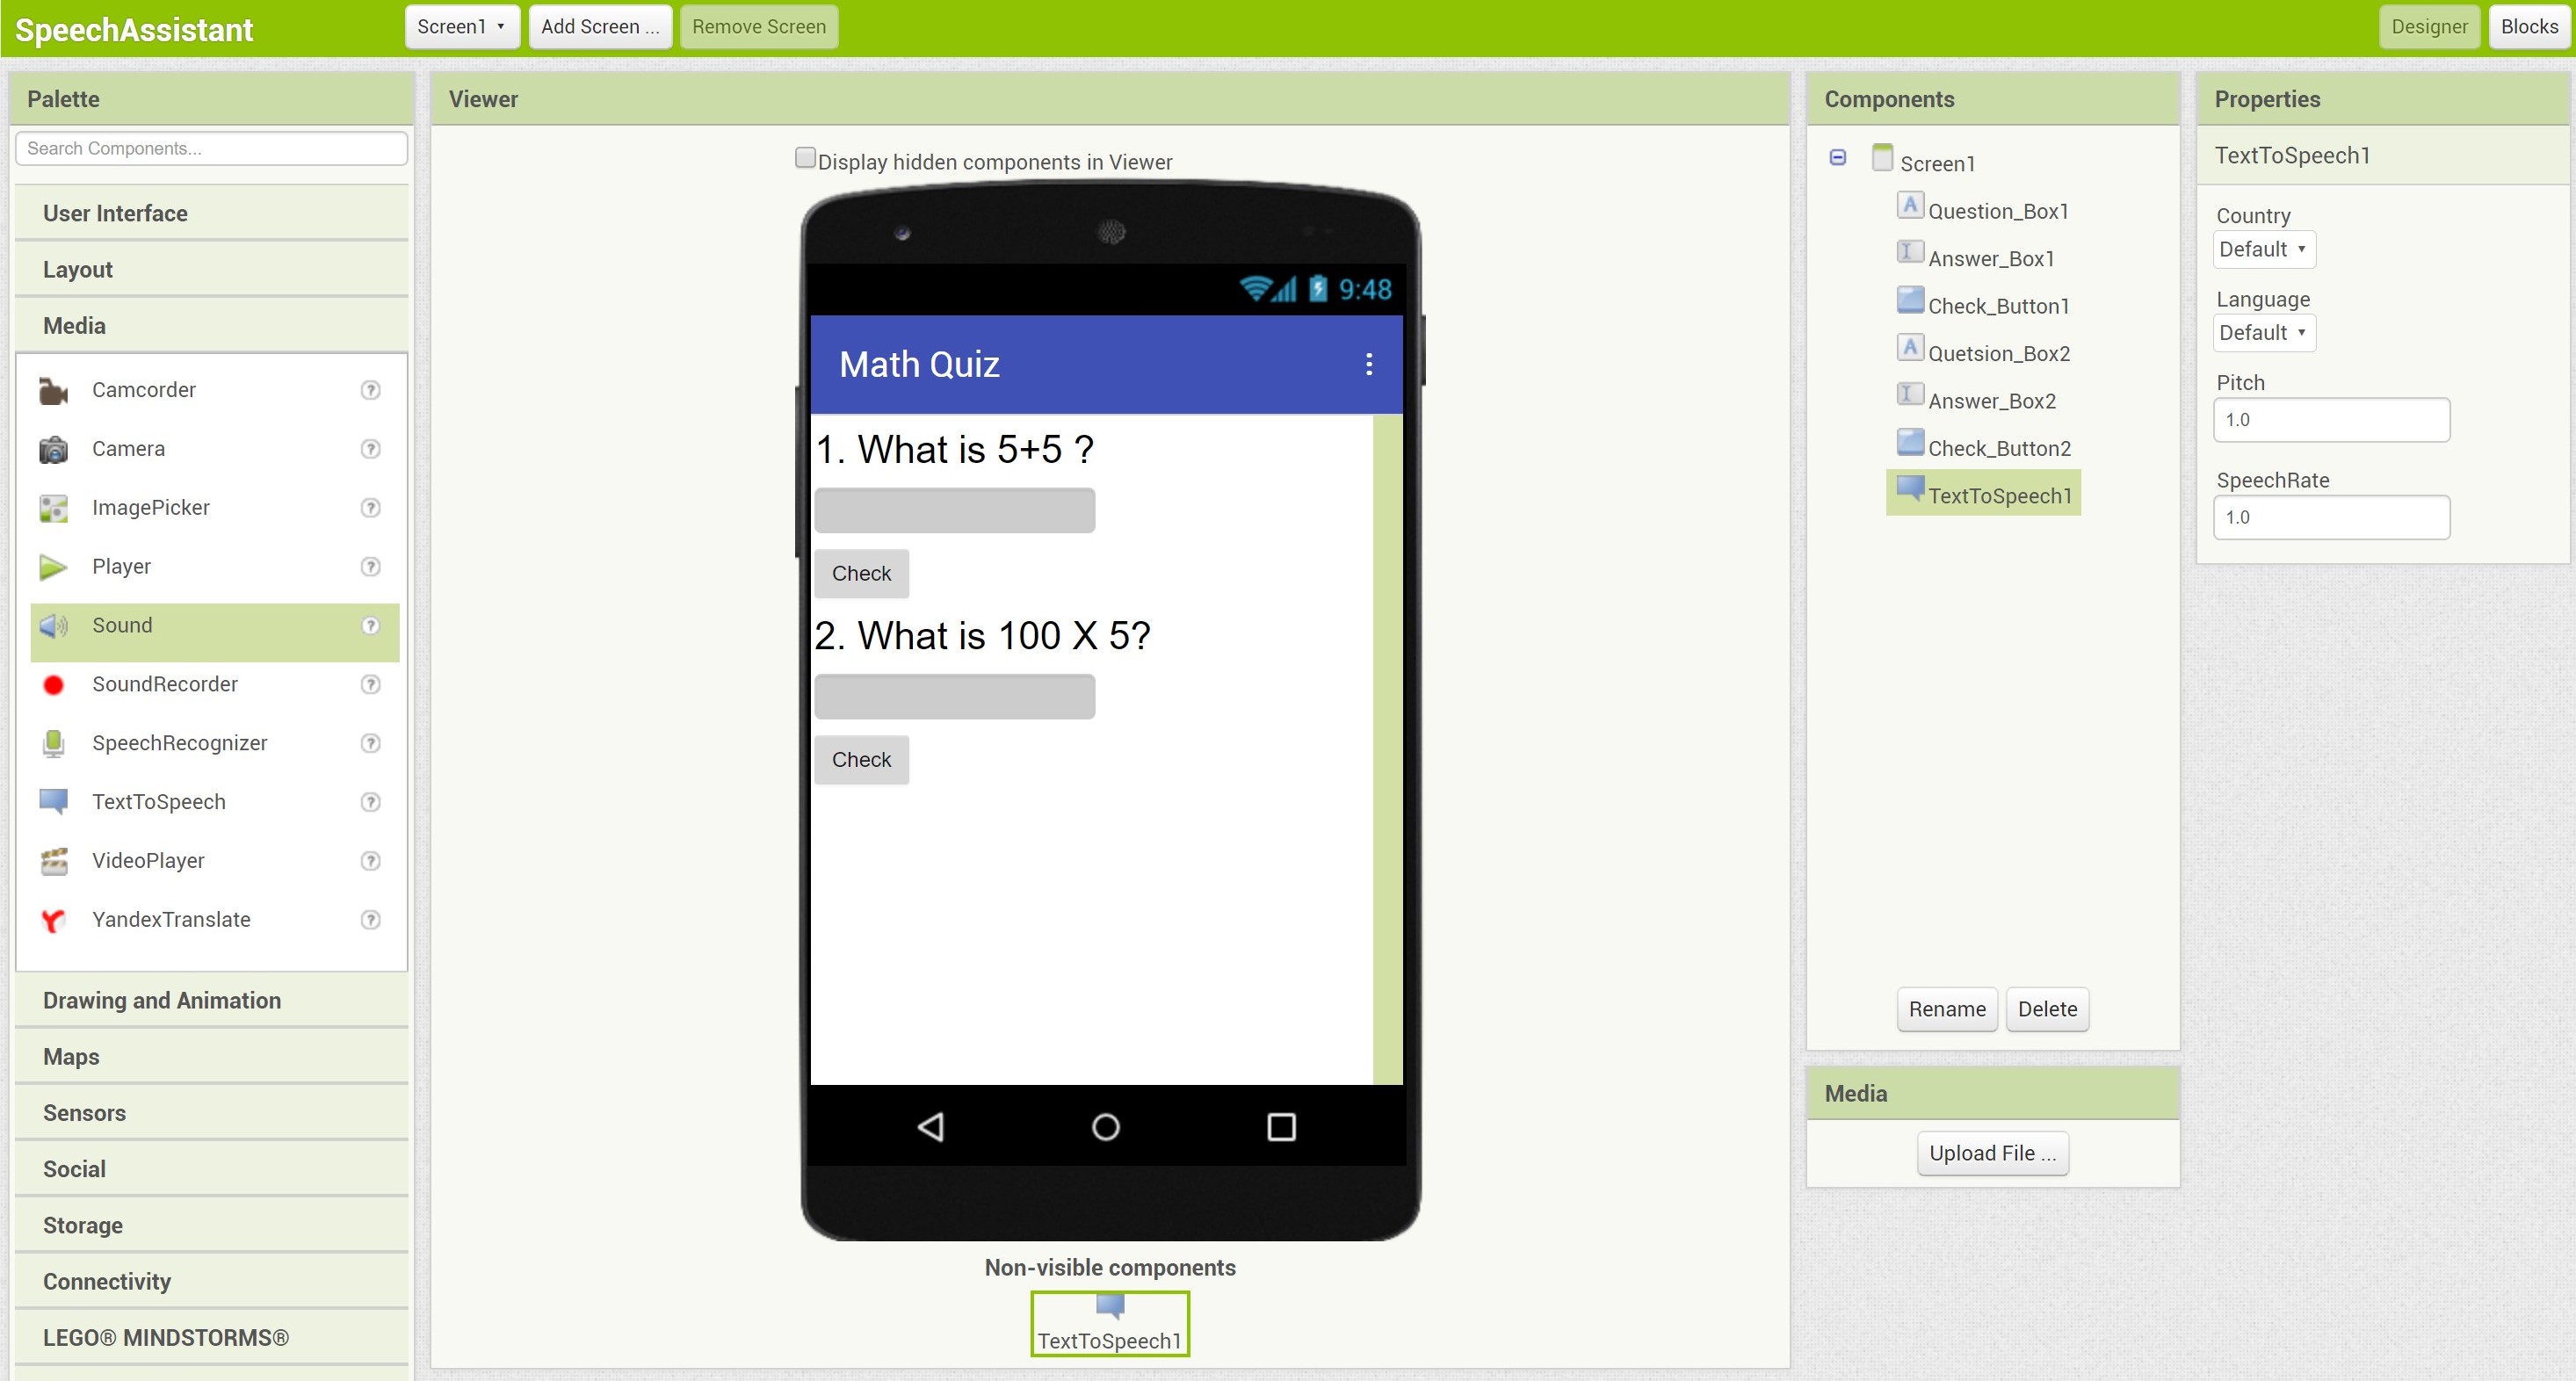
- Drag and Drop TextToSpeech Component from Palette -> Media
|
|
|
|
10
|
Coding the App
So the User Interface of the app has been developed. Now, Let’s move on to develop code for the app. On Top Right corner click on Blocks
|
|
|
|
11
|
Code the Button for Question 1
In This Step we are going add the block which is called when the button is clicked
- Go to Blocks section
- Click on Check_Button1
- Drag and Drop when Check_Button1.click to the viewer panel.

|
|
|
|
12
|
Add If-Then Block for Check Button 1
Since we are going to check whether the answer is correct or wrong, inside the click block we have to add an IF condition to check the answer.
- Go to Blocks section
- Click on Control
- Drag and Drop If-Then Block inside when Check_Button1.click block in the viewer panel.

|
|
|
|
13
|
Add Condition for the If Block
Now that we have added the if block, we have add the condition inside it to which checks whether the answer typed by the user is same as the answer of the question. Since the Question here is what is 5+5, the answer is 10
- Go to Blocks section
- Click on Logic
- Drag and Drop Equal Condition Block in the If Block
- Click on Answer_Box1
- Drag and Drop Answer_Box1.Text to the Left Hand Side of the Equal Condition Block
- Go to Blocks section
- Click on Math
- Drag and Drop the Empty Number Block
- Click on it
- Enter number 10

|
|
|
|
14
|
Add TextToSpeech Component
After checking the answer typed by the user and the IF condition is true, we have to make the app speak and affirm the answer. So we are going to add the TextToSpeech Component
- Go to Blocks section
- Click on TextToSpeech1
- Drag and Drop call TextToSpeech1.Speak inside the Then Block

|
|
|
|
15
|
Add the Speech Response
For the affirming phrase we can use anything like "Good one","Great, Correct Answer".. etc. It is totally your choice
- Go to Blocks section
- Click on Text
- Drag and Drop Empty Text Block inside the message of call TextToSpeech1.Speak
- Click on it
- Enter Text as Good Job, It’s the correct answer

|
|
|
|
16
|
Add Else Block
As of now we have covered only the True case of the IF condition. For the False case we have to add ELSE to the IF
- Click on Settings in If-Then Block
- Drag and Drop the else block as shown in figure
- Go to Blocks section
- Click on TextToSpeech1
- Drag and Drop call TextToSpeech1.Speak under the else Block

|
|
|
|
17
|
Add Response for the else case
If the answer is not correct then we have to make the app speak negative responses.So similarly we have to add the TextToSpeech Component here. Phrases such as "No", "Wrong Answer", "Try again" can be given as the message for the TextToSpeech component to speak out.
- Go to Blocks section
- Click on Text
- Drag and Drop Empty Text Block inside the message of call TextToSpeech1.Speak
- Click on it
- Enter Text as Wrong Answer,Try Again.

|
|
|
|
18
|
Code For Question 2
Similarly We are going to do the above steps for the next question
- Go to Blocks section
- Click on Check_Button2
- Drag and Drop when Check_Button2.click to the viewer panel
- Go to Blocks section
- Click on Control
- Drag and Drop If-Then Block inside when Check_Button2.click block in the viewer panel
- Go to Blocks section
- Click on Logic
- Drag and Drop Equal Condition Block in the If Block
- Click on Answer_Box2
- Drag and Drop Answer_Box2.Text to the Left Hand Side of the Equal Condition Block
- Go to Blocks section
- Click on Math
- Drag and Drop the Empty Number Block
- Click on it
- Enter number 500

|
|
|
|
19
|
Add Responses for Question 2
- Go to Blocks section
- Click on TextToSpeech1
- Drag and Drop call TextToSpeech1.Speak inside the Then Block
- Go to Blocks section
- Click on Text
- Drag and Drop Empty Text Block inside the message of call TextToSpeech1.Speak
- Click on it
- Enter Text as Good Job, It’s the correct answer
- Click on Settings in If-Then Block
- Drag and Drop the else block as shown in figure
- Go to Blocks section Click on TextToSpeech1
- Drag and Drop call TextToSpeech1.Speak under the else Block
- Go to Blocks section
- Click on Text
- Drag and Drop Empty Text Block inside the message of call TextToSpeech1.Speak
- Click on it
- Enter Text as Wrong Answer,Try Again.

|
|
|
|
20
|
Testing The App
- Now the developing part has been completed. Let’s test it on our android mobile.
- Go to Connect in task bar present on the top then select AI companion to test via WiFi (or) select USB to test via USB Cable.
|
|
|
|
21
|
Downloads
- Click on the Download button to download the final project file with all the code and User Interface.
- A file called MathQuiz.aia will be downloaded.
- You can import this project file into your MIT App Inventor by going to File -> Import project (.aia) from my computer.
Download
|
|
|
|
|

-4.jpg&h=240&w=600&zc=1)
-5.jpg&h=240&w=600&zc=1)

