|
|
|
|
|
2
|
Importing Library files and Plugins
- In order to construct the track for rollercoaster, splines will be used. This comes as a part of the library files. The SPEngine library file will also be an updated one to support the rollercoaster building. The older SPEngine library file cannot be used here. For this project alone the modified SPEngine library file will be used.
- Make sure you have the library files for track construction using splines and updated SPEngine. Download the files using the download button at the bottom.
- Extract the downloaded file Rollercoaster.zip in the downloaded location.
- Inside the extracted Rollercoaster folder, there will be a folder called Plugins. To construct the rollercoaster track, we require some additional files (plugins) that provide the track construction functionality in Unity.
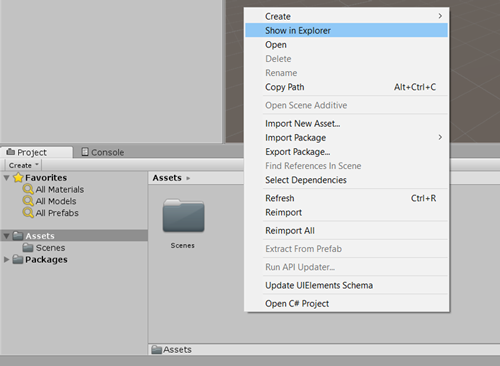
- So copy the folder Plugins and then go back to Unity. In the project window at the bottom, click on Assets folder on the left side. Now on the right side, right click in the empty space and click on Show in Explorer.
- Now paste the copied Plugins folder in the Assets folder that is open.
- Now go back to Unity, the pasted Plugins folder will start loading in it.
- Once done, go to Create Objects in the Hierarchy section. This will show Bezier Spline at the last. Select it.
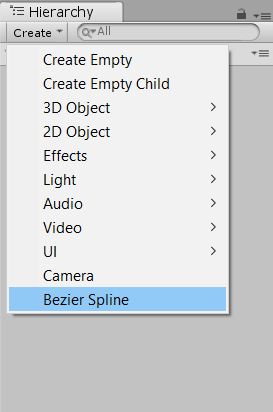
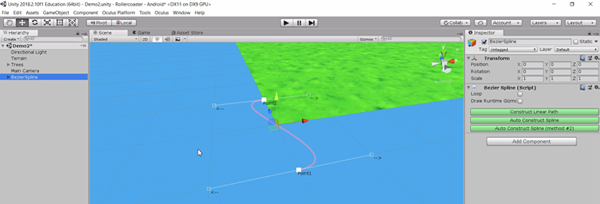
- A Bezier spline with two points will be created.
|
|
|
|
3
|
Track construction using splines
Construct the track by referring to the track-spline-construction.mp4 video present in the Tutorial Videos of the folder downloaded from this tutorial (Scroll down to the bottom to find the download button if not already downloaded)
|
|
|
|
4
|
Generating Rails along the constructed splines
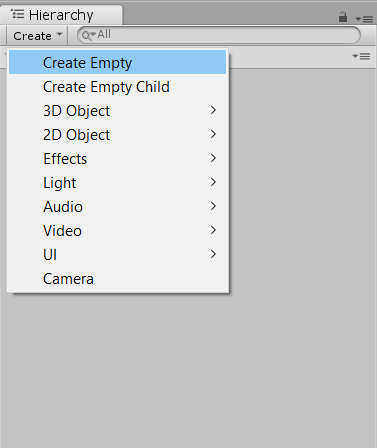
- Create a new Empty Game object and name it as Track. We will be generating rails along the constructed spline. The rail objects will be added as children of this Track game object.
- Now go to the previously downloaded and extracted rollercoaster folder. Inside it, there will be a folder called Scripts. The scripts folder will have the necessary scripts for track generation, speed control of rollercoaster and the Libraries folder which will have the updated SPEngine library file and some other files.
- Copy the Scripts folder and then go back to Unity. In the project window at the bottom, click on Assets folder on the left side. Now on the right side, right click in the empty space and click on Show in Explorer.
- Now paste the copied Scripts folder in the Assets folder that is open.
- Go back to Unity, the scripts will start loading. Once done, open the Scripts folder. It will have a script called TrackBuilder which will be responsible for generating the left, right rails and cross-beams along the constructed bezier spline. It will have the function called BuildTrack() which will use the VR class from SPEngine library to build the rollercoaster track.
- Now assign this script from to the Track Game object by dragging the TrackBuilder script from the Assets folder and dropping it into the Track game object.
- Select the Track gameObject, see the Inspector window, the TrackBuilder script should be there attached as a component.
- In the Scripts folder, there will be a folder called Editor. Inside it, there will be a script called TrackBuilderEditor which is responsible for showing the Generate Track Button below the TrackBuilder script component in the inspector window.
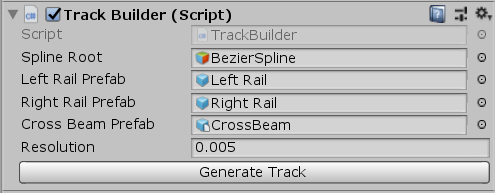
- Now we need to assign the required public gameobjects required by the TrackBuilder script component
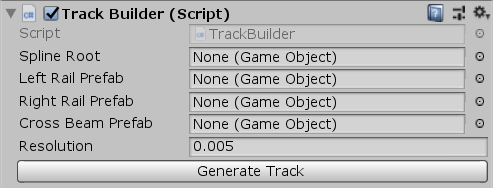
- For the Spline Root, assign the BezierSpline game object by dragging and dropping the BezierSpline game object from the hierarchy section to the Spline root public field in the Track Builder script component.
- For the Left Rail and Right Rail Prefab, we need to create those game objects manually. Refer to the creating-rail-prefabs.mp4 video in the Videos folder located in rollercoaster folder you downloaded and extracted.
- After creating and assigning the left, rail prefabs.
- Next the crossbeam prefab should be assigned. For this, go to the rollercoaster folder you downloaded and extracted. Inside it there will be a folder called Models.
- Copy the Models folder and then go back to Unity. In the project window at the bottom, click on Assets folder on the left side. Now on the right side, right click in the empty space and click on Show in Explorer.
- Now paste the copied Models folder in the Assets folder that is open.
- Go back to Unity, the models will start loading. Once done, open the Models folder. A model called CrossBeam will be present. Drag an drop it into the Cross Beam Prefab field in the Track Builder script component attached to the Track gameobject.
- The resolution parameter of the TrackBuilder script defines how smooth the generated track should be. Resolution towards 1 will make the track look very bad with very linear constructions. Resolution towards 0 will increase the smoothness and curves for the track but decreasing towards 0 too much might have unexpected results.
- After assigning everything the TrackBuilder script component should look like this
- We would want to generate/re-generate the track in editor whenever we update the bezier spline. For this purpose there will be a script inside the scripts folder called TrackBuilderEditor. This script will create a custom inspector for the TrackBuilder script to show a button Generate Track in the inspector which upon clicking will call the buildTrack() method in the script and generates the track.
- Now, click the Generate Track button attached to the Track Builder script. This should now create the rails across the Bezier Spline. Adjust the resolution parameter if the track isn’t generated properly in some places.
|
|
|
|
5
|
Making a cube to move along the track
- For now, we will create a cube with the camera attached to it which will move along the track.
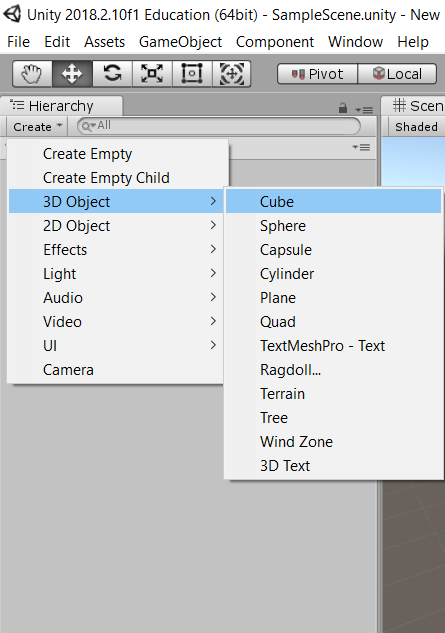
- Create a cube, by going to Create in Hierarchy section. Select 3D Object -> Cube.
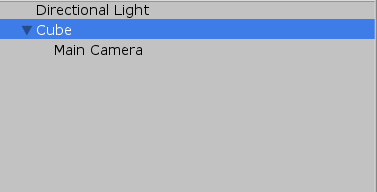
- Now make the Main Camera as a child of the cube by dragging the Main Camera game object and dropping it into the Cube gameobject created now.
- Reset the transform position of the Main Camera to origin (X -> 0, Y -> 0, Z -> 0) so that it will be positioned inside the cube.

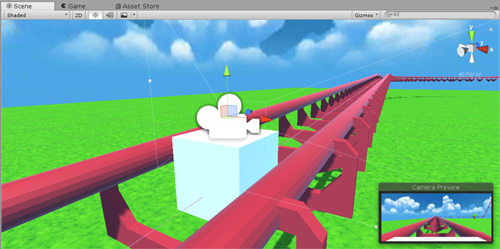
- Now reposition the cube to be on the track and then select the camera to lift it up along Y-axis to view the ride better.
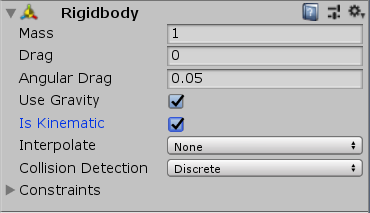
- Since the cube is going to be a moving object, we need to add a rigidbody component to it and enable isKinematic to ignore physics forces and to make it controllable via script. So, select the Cube in the Hierarchy. Then in the inspector window, click on Add Component. Search for Rigidbody and hit Enter.
- Now in the Rigidbody component, enable isKinematic property.
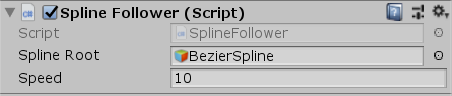
- Inside the scripts folder, there will be a script called SplineFollower. This will be responsible for moving the cube along the spline at the given speed.
- Drag and drop the SplineFollower script into the cube game object. You should see it attached as a component.
- Run the Scene and you can see the cube starts following the track.
- Adjust the speed in the inspector, and see the changes during runtime.
|
|
|
|
|
|
7
|
Adding sound effects
- To add sound effects of rollercoaster sound, Audio Source will be used.
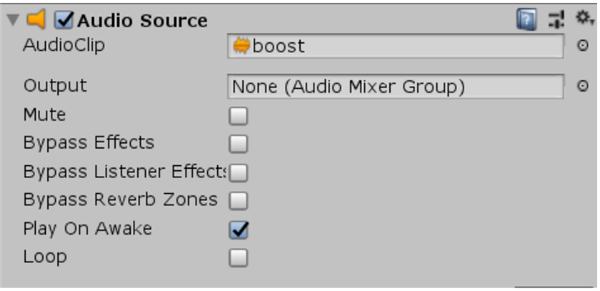
- First we will be adding a boost sound to indicate the start of the ride. Select the Track game object and in the Inspector window, click on Add Component. Search for Audio Source and select it. The Audio Source component will be added.
- For this, go to the rollercoaster folder you downloaded and extracted. Inside it there will be a folder called Sounds.
- Copy the Sounds folder and then go back to Unity. In the project window at the bottom, click on Assets folder on the left side. Now on the right side, right click in the empty space and click on Show in Explorer.
- Now paste the copied Sounds folder in the Assets folder that is open.
- Go back to Unity, the sound files will start loading. Once done, open the Sounds folder.
- From the provided sound files, select boost.mp3 and drag and drop it on the AudioClip field of the Audio Source component attached to the Track game object. Check Play on Awake to play the audio when the scene is started.
- Then assign the slow, fast, normal audio clips to SpeedController Script assigned to car cube. Normal audio clip will be playing at first, then it should be faded to slow audio clip while climbing up. Then it should fade to fast audio clip while going down. SpeedController Script will need an external library script for fading between two audio sources, DoubleAudioSource library script will be used.
- Go into the Assets->Scripts->Libraries folder. Drag and drop the DoubleAudioSource script to the Car cube. Two audio sources will be automatically added along with it. Uncheck the Play on Awake option in those two and check the Loop option to keep the audio playing in loop when started from the script.

- Run the scene and check whether the audio is playing rightly when the speed marker cubes are hit.
- !!!Note!!!! - At the end after completing the development of this app, when build and run is given from unity to run on oculus, the app will automatically start in oculus. Sometimes apps with sound, doesn’t play the sound when launched like this automatically. So when it gets opened, exit the app and launch it by selecting the app manually from the oculus library.
|
|
|
|
8
|
Replacing car cube with rollercoaster model
- We will replace the car cube with an actual rollercoaster car’s 3d model. Go into Assets->Models folder. Drag the Rollercoaster car 3d model into the scene.
- Reposition and scale it to fit in the track.
- Move the Main Camera game object from the car cube and make it as a child of the rollercoaster car. Reposition the camera for a better view of the ride.

- The same scripts and components that had been assigned for the car cube now has to be assigned for rollercoaster game object.
- So select the Rollercoaster game object, add the Rigidbody component and select is Kinematic property in it. Then assign the SplineFollower script, SpeedController script, DoubleAudioSource script. For the SpeedController script, assign the Fast, Normal, Slow Audio clips as did before.
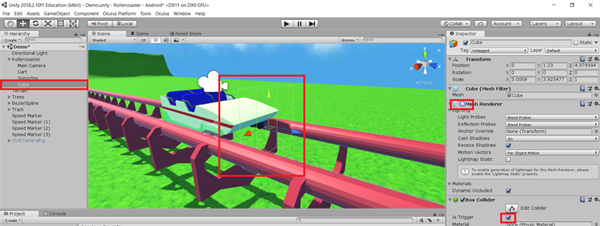
- Since this is a custom game object, it doesn’t have a collider attached to it. To detect collision with the speed marker and its trigger event in the script, create a child cube in the rollercoaster car object. Position it in the front and scale it. Then disable the mesh renderer and enable Is Trigger property of Box Collider.
- Remove (or) disable the earlier created car cube
- Run the scene and check whether the speed gets lowered when climbing the track and increases when falling down the track. If not, then during play mode check in scene view whether the rollercoaster is actually hitting the speed markers and adjust the position/size of speed markers as necessary.
- Refer to the test-run.mp4 video provided in the Tutorial Videos inside the downloaded folder to see how the rollercoaster runs after implementing everything.
|
|
|
|
9
|
Replacing Main Camera with OVRCameraRig
- Refer to the oculus-asset-ovrcamera.mp4 video provided in the Tutorial Videos inside the downloaded folder, to import the Oculus Integration Asset and then to assign the OVRCameraRig to the rollercoaster instead of the MainCamera.
- Once done, follow the steps explained in the previous chapters to Build and Run the application in Oculus Go
|
|
|
|
10
|
Download Files
- Click on the Download button.
- A file called Rollercoaster.zip will be downloaded.
- After downloading, extract the zip file. This contains the necessary scripts, models, plugins and tutorial videos for using with this project.
- Use each of them as instructed in the steps from the beginning
Download
|
|
|
|
|

-4.jpg&h=240&w=600&zc=1)
-5.jpg&h=240&w=600&zc=1)